Disclosure: Some of the links below are affiliate links. This means that, at zero cost to you, I will earn an affiliate commission if you click through the link and finalize a purchase. Learn more!
In this article, you'll learn exactly how to multistream from your Xbox to platforms like YouTube, Twitch, Kick, Facebook, and any other RTMP destinations without needing a capture card or an expensive computer! All you need is a computer to set this up initially, and then afterward you can adjust everything from your phone.
Choosing Your Plan
The software that we're going to be using is called Lightstream Studio. If you already have a Lightstream Studio plan, the multistreaming feature will already be included at no additional cost. If you have never used Lightstream before, this software can also be used to add overlays to your console as well as streaming to multiple platforms. Doing this is a great way to start really growing your channel!
You can see the different plan options in the photos below. The first is the monthly plan options, and the second is the annual plan options.

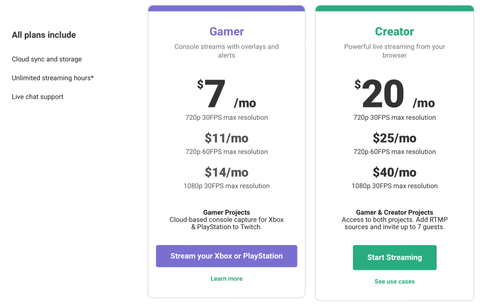
With these plans, you do get a 7-day free trial to ensure that you like the software and to give you time to try anything out. If you click here, you can get 35% off of any of their plans!
When you're choosing your plan, I would not recommend getting the 60 FPS option as Xbox only supports 30 FPS, so the 720p or 1080p is what you're going to want to get.
Setting Up Your Lightstream Account
After you have chosen your plan, you'll be brought to your dashboard which will look like this.
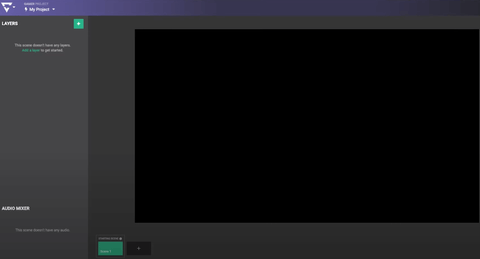
In the top-left-hand corner, you'll see where it says 'My Project'. Click on this and give your project a name. You will also need to set the 'Resolution' which will just be the same as the subscription plan that you purchased. It's super important that you toggle 'Auto Live Project' on. This means that when you go live from your Xbox to Twitch, it will automatically go live with your overlays to the destinations that you have selected.
I'm going to be utilizing a project that I have previously set up which includes my overlays, starting soon, countdown timer, gameplay, and just chatting scenes.

If you want to learn how to add overlays on your Xbox using Lightstream, click here! If you see any overlays that you like here, be sure to check Stream Designz! There are lots of different options for overlays, animated overlays, countdown timers, and more!
Now, in the top-right corner, if you click on your username, you'll find the option to select the destinations that your stream will be sent to.
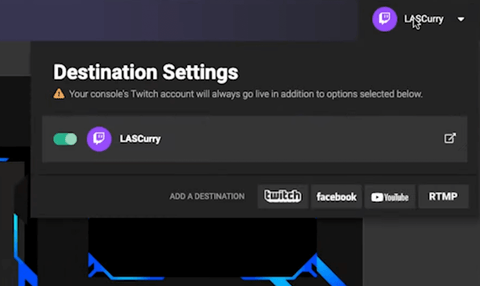
By default, Twitch is selected. It is mandatory that Twitch be one of the five destinations that you send your stream to as it is the only console destination that you have on your Xbox. It has to go from Twitch over to Lightstream so that it can be sent to other platforms. Once you have Twitch selected, you can select your other destinations.
You have up to 5 destinations that you can send your stream to, it's really four since one of them has to be Twitch, but with these, you can send them wherever. You can even have your live stream sent to multiple Twitch or YouTube accounts if you want.
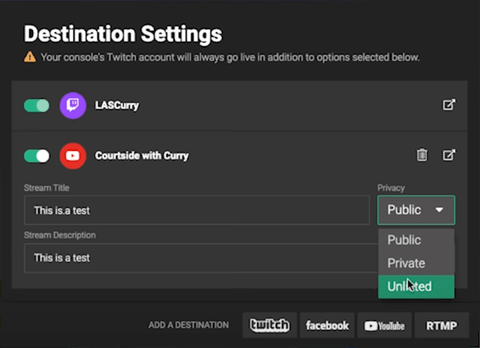
I'm going to add YouTube as my first location, so I'll just select this and get logged in. Once you're logged in, it will ask you to authorize Lightstream to access your YouTube account, which you will need to allow. If you have never live-streamed before on your YouTube account, you have to go to your account and authorize live streaming, then it will take 24 hours before you can get access to stream, so just keep this in mind.
After you've added this, be sure to toggle YouTube on, and then add your 'Stream Title' and 'Stream Description'. For now, I'm just going to make mine say, "This is a test." You will also need to decide if you want this stream to be public, private, or unlisted. Public means that everyone can view your stream, private means that only you can view your stream, and unlisted means that anyone with the link can view the stream.
Next, I'm going to add Kick as another one of my destinations. To do this, select RTMP, name this 'Kick', and when you toggle this on, it will ask you to 'Ingest Server URL' and paste in your 'Stream Key'. To find these, you'll need to get logged in to your Kick account, go to 'Settings', and then go to 'Stream Key'. Once you have these, you just need to copy and paste them into Lightstream.

This is all just telling LightStream that every time you go live on your Xbox, you want the stream to be sent over to these platforms as well. Remember too that you can still send this to two more locations if you want.
Adjusting Your Xbox Settings
Once you've gone ahead and set all of this up, it's time to set some things up on your Xbox to make sure that your stream can be sent to Twitch.
On your Xbox, hit the home button on your controller, and then head over to 'Capture and Share'.
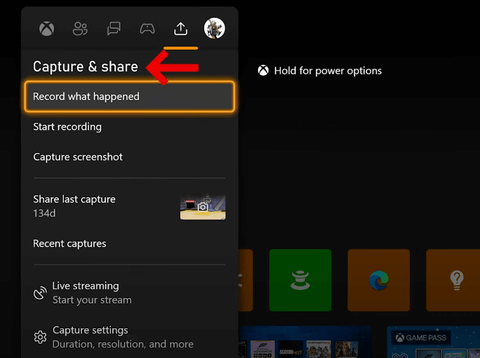
From here, scroll down and select 'Live Streaming'. If you've never used live streamed before from your Xbox, you'll be prompted to connect your Twitch account. After you're signed in, it will bring you to a dashboard like this.
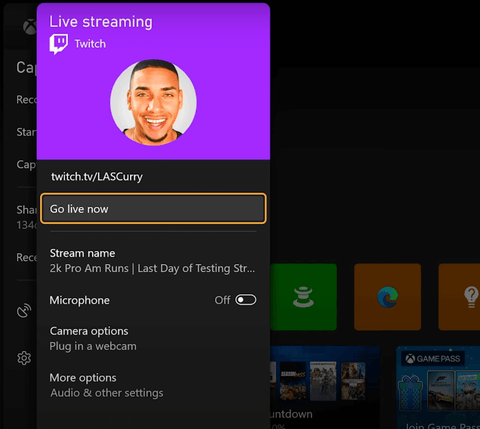
The first thing you'll do here is go to 'Stream Name', and you will input your stream title.
Now, you want to make sure that your microphone is toggled on. If this is turned off, it means that you don't have a microphone connected to your controller or your Xbox.
If you have a camera connected to your Xbox, you'll turn this on under 'Camera Options' and then it will be sent over to Lightstream as well.
This is super important. If you want the stream to pick up the audio of the people who are in your party, you must turn on 'Party Audio' and then they will have an option above their name that says 'Include Audio and Broadcast' which must also be selected. Then, you'll have the option to adjust your game and microphone volume.
What's also really important here is the 'Resolution and Bitrate'. The resolution that you select should again match the Lightstream subscription that you purchased.
For the destination, you want to make sure that this is not on 'Twitch' by default, but on 'Lightstream'.
Once you've done all of this, you can now press 'Go Live' on your Xbox, and it will send your stream to Lightstream which will then send it over to all of the destinations that you selected.
Just having your stream be sent to all of these different locations is a great step towards growing your channel and audience, but having quality overlays, like the ones from Stream Designz, will give your stream a professional feel that will keep viewers coming back and new viewers coming in. Check out this video here to learn how to add these to your stream!


Share:
How to Use Loupedeck Live S to Manage Your Stream
How to Multistream on PS5 to YouTube Twitch & Kick