In this tutorial, I'll be explaining to you why you should stop downloading your Twitch VODs directly from Twitch. I'll also be showing you a better way to be able to do this to get the highest quality of your stream so that you can edit it and post it on social media.
What You Normally Do
The first thing that you normally do after your stream is you'll come into Twitch and just simply press the little three dots next to your stream and select 'Download'. The only issue with this is that when you download it, Twitch compresses the stream which lowers its quality. Then, when you put it into your editing software, it's not going to look as crisp as it did while you were streaming.
There is a way to get around this.
Using OBS for Higher Quality
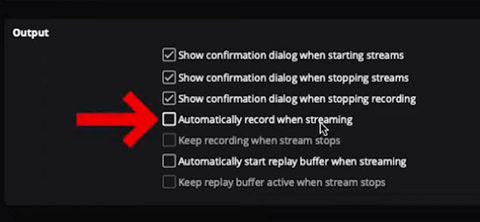
Inside OBS Studio, all you need to do is go to 'Settings', then go to 'General', and check the box under 'Output' that says 'Automatically Record When Streaming'.

You might be saying, "My computer can't support that," but I'm going to explain how you can record the actual stream as you're streaming without additional resources.
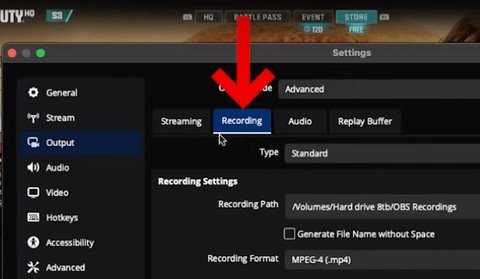
With that box selected, you can press 'OK'. Then, you'll come back to settings, go back to 'Output', and this time, go to 'Recording'.

Where it says 'Video Encoder', all you want to do is select 'Use Stream Encoder'. What this means is that it is going to go ahead and use the same encoding that you're using for your stream and all it's going to do is record it at the same time. It's not going to pull any additional resources.
You may be saying, "I don't have the space on my computer to be able to support the recording." The beautiful thing is that once you create the space for it, record the stream, and edit your stream, you can then delete the file and continue to have space for all of your future streams.
This is how you're going to get the best quality possible.
If you're not really into editing and you want to use AI to edit your content for you, check out this video here. In it, I will walk you step-by-step through how to use your Twitch streams and turn them into clips that you can post to TikTok, Instagram, or YouTube Shorts.


Share:
How to Stream in 1440p 60fps to YouTube with OBS [No LAG]
How to Setup a Chatbot on Twitch [NightBot]